Figuring out how to remove a crank sensor might seem like a challenge, but it’s totally doable with the right approach. Many car owners end up needing to replace this part at some point, so having a clear guide can save you both time and cash. Whether you're dealing with a stubborn sensor or just want to learn more about the process, this guide breaks it down in simple steps. You won’t need fancy tools or an engineering degree to follow along, either.
When you're working on your car, it's important to have a basic understanding of what you're doing. The crank sensor is one of those parts that plays a big role in keeping your engine running smoothly. If it goes bad, you might notice your car stalling or not starting at all. Luckily, replacing it isn't as scary as it sounds. With a bit of patience and the right tools, you can handle this job yourself.
Now, let's get into the details. If you're like most people, you're probably wondering how to tackle this project without causing any damage. Don't worry—this guide will walk you through each step. You'll learn everything from locating the sensor to making sure everything fits perfectly when you're done. So, grab your toolbox, and let's get started.
What Exactly is a Crank Sensor?
Alright, before we dive into the steps, let’s talk about what the crank sensor actually does. This little part is like the engine's heartbeat monitor. It keeps track of the crankshaft's position and speed, sending that info to the car's computer. When it's working right, your car runs smoothly. But when it starts acting up, you might notice issues like rough idling or trouble starting the engine.
So, why does it need to be replaced? Sometimes, these sensors just wear out over time. Other times, corrosion or damage from oil or dirt can cause problems. Either way, replacing it is usually the best solution. Now, let’s move on to the fun part—removing the old one!
How to Locate the Crank Sensor in Your Car?
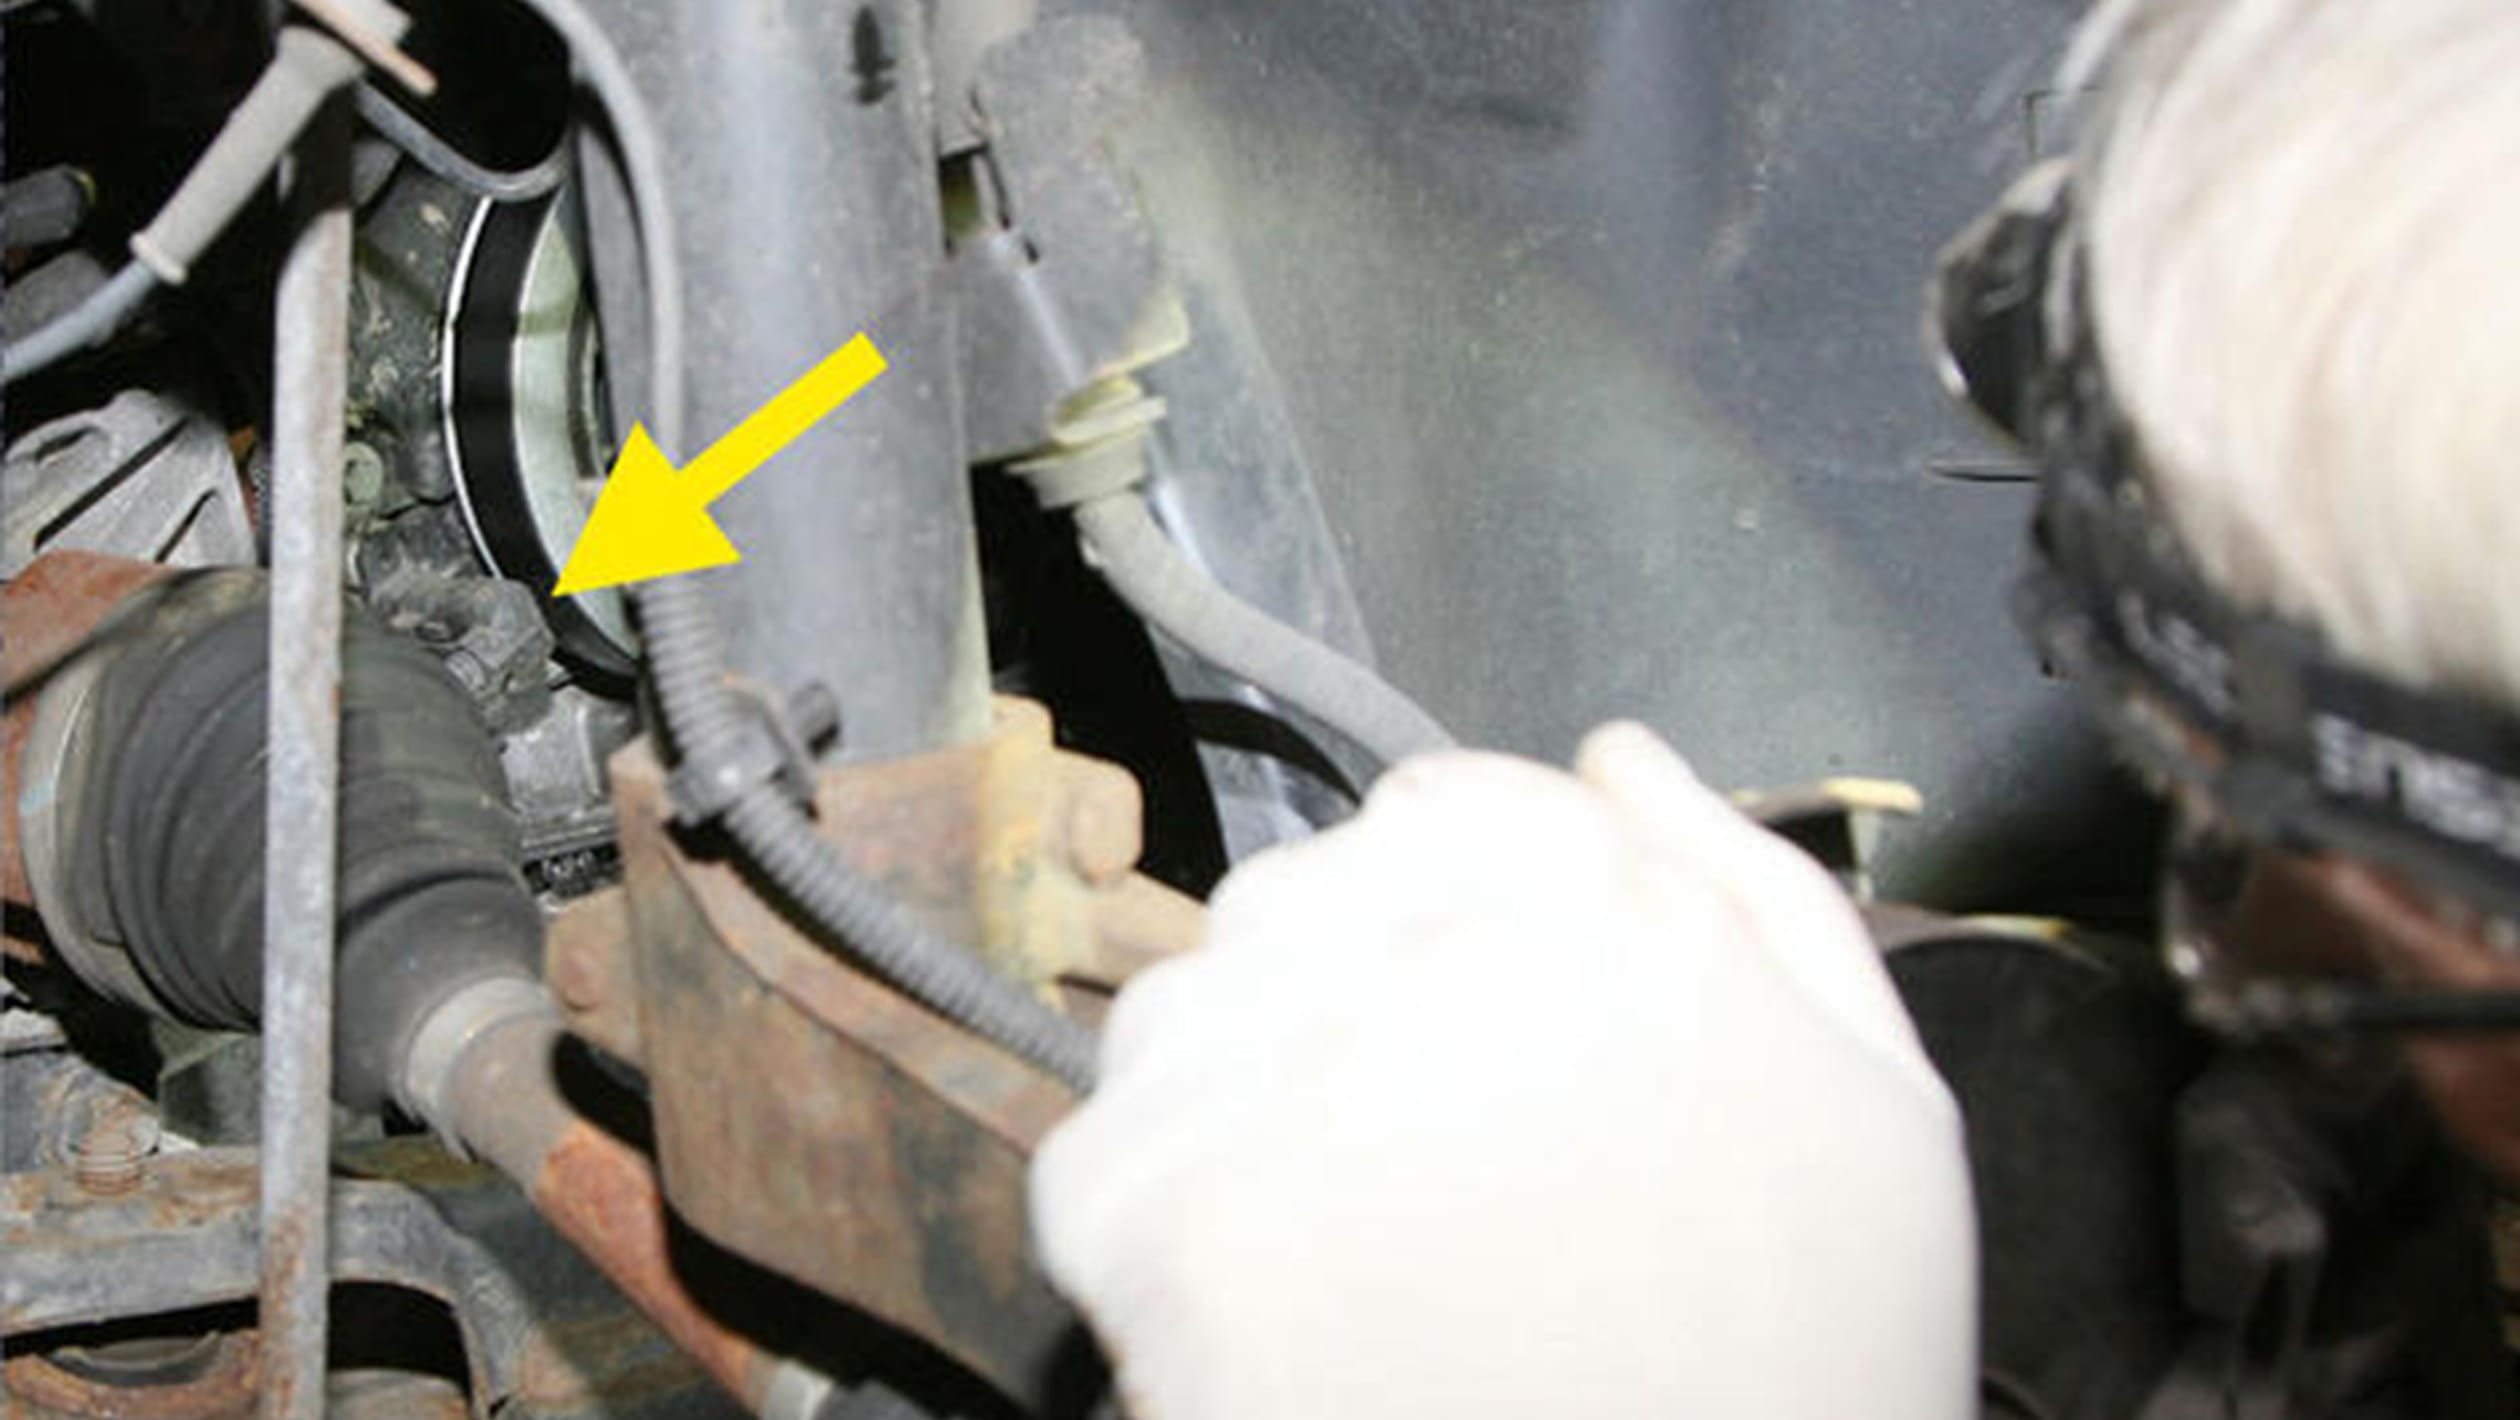
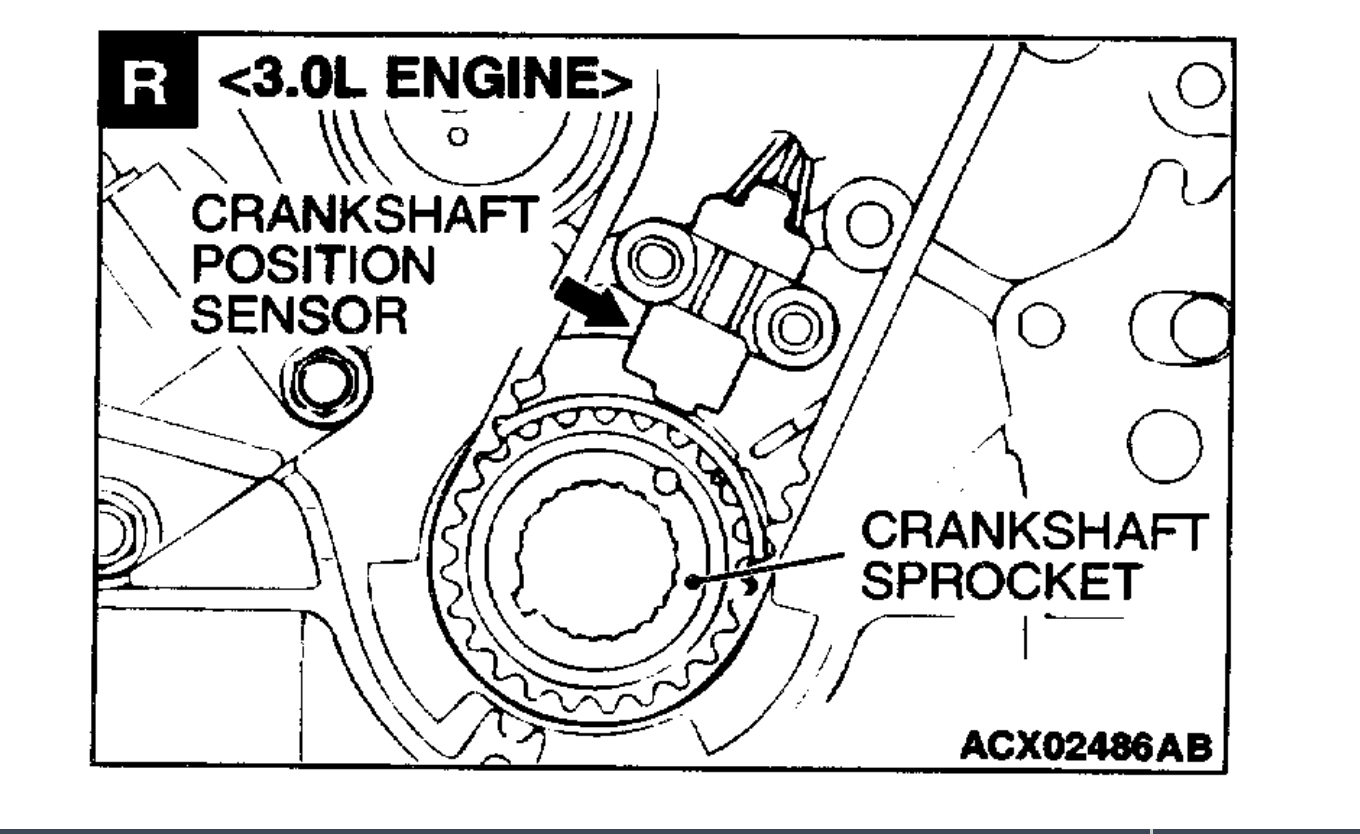
Before you can remove the crank sensor, you need to know where it is. Most of the time, it's tucked away near the bottom of the engine. Sometimes, it’s behind the starter motor, which means you’ll need to take that out first. Don’t worry, though—this isn’t as hard as it sounds. Just make sure you have a shop light handy so you can see what you’re doing.
- Bostick Devon
- Thirty Dollar Website
- Less And More Coffee
- Glue Song Lyrics
- North American Senior Benefits
If you notice the sensor is oily or greasy, now’s a great time to clean it up. A little carburetor cleaner can work wonders here. This will help you get a better grip and make the job easier. Once you’ve located it, double-check that you’re looking at the right part. It’s usually a small, cylindrical piece with a wire coming out of it. If you’re not sure, consult your car’s manual for a clearer picture.
How to Safely Remove the Crank Sensor?
Now that you’ve found the crank sensor, it’s time to take it out. First things first, disconnect the negative battery cable. This is super important for your safety. You don’t want any sparks flying around while you’re working on electrical components. Once the battery is out of the picture, you can focus on the sensor itself.
Most crank sensors are held in place by a single bolt, usually a 10mm size. Grab your socket wrench and turn the bolt counterclockwise. If it’s stuck, don’t force it. Wiggle it a bit to loosen things up. Once the bolt is off, gently pull the sensor out of its hole. If it resists, double-check that the bolt is fully removed. Sometimes, a bit of rust or grime can make it tricky to budge.
Do You Need Special Tools for This Job?
For the most part, you can handle this job with basic tools you probably already have. A socket wrench set is your best friend here. If the bolt is a Torx type, you’ll need the right bit for that. Most people find that a ratchet and socket combo works great. Just be careful not to strip the bolt or damage the threads.
Some people recommend using a bit of penetrating oil, like PB Blaster, if the sensor is stuck. This can help loosen things up and make the job go smoother. If you’re dealing with a particularly stubborn sensor, you might need to get creative. Drilling a small hole into the timing cover can sometimes help you get a better grip. Just be careful not to damage any surrounding parts.
How to Check the New Sensor Before Installing It?
Before you pop the new sensor into place, take a moment to compare it to the old one. Make sure they’re the same size and shape. Also, check the connector to ensure it matches. This will save you a headache later on if something doesn’t fit right. If everything looks good, you’re ready to move forward.
Now, let’s talk about the connector. Sometimes, these can get a little stuck due to weather seals or corrosion. Wiggle it gently to unplug it from the old sensor. Inspect the connector for any rust or damage. If it looks bad, you might want to clean it or replace the pigtail. This will help ensure a good connection when you install the new sensor.
How to Avoid Common Mistakes When Removing a Crank Sensor?
One of the biggest mistakes people make is rushing through the job. Take your time and make sure you’ve got everything ready before you start. Forgetting to disconnect the battery or not having the right tools can turn a simple job into a nightmare. Also, be mindful of the sensor’s orientation as you remove it. Note how it comes out, as it will likely only fit back in one way.
Another common issue is damaging the sensor while trying to remove it. If it’s stuck, don’t force it. Use a bit of patience and maybe some penetrating oil to help it along. Sometimes, a little extra effort upfront can save you a lot of hassle later on. Remember, this is your car we’re talking about, so it’s worth taking the extra time to do it right.
What Tools Do You Need to Replace the Crank Sensor?
Here’s a quick list of what you’ll need for this job:
- Socket wrench set
- Torque wrench (optional)
- Penetrating oil (like PB Blaster)
- Shop light
- Carburetor cleaner (if the sensor is oily)
Most of these tools are pretty standard, so you probably already have them lying around. If you don’t, they’re not too expensive to pick up. Having the right tools can make all the difference when you’re working on your car. Plus, it’ll make the job go a lot faster.
Why Should You Do This Job Yourself?
Replacing a crank sensor is one of those jobs that can save you a ton of money if you do it yourself. Mechanics often charge a pretty penny for this kind of work, even though it’s relatively straightforward. Plus, you’ll learn a valuable skill that you can use for other car repairs down the road.
Of course, there’s also the satisfaction of knowing you did it yourself. There’s something really rewarding about fixing your own car. It’s like solving a puzzle or completing a project. Once you’ve done it once, you’ll feel more confident taking on other repairs. Who knows? You might even start to enjoy working on your car!
What Should You Do After Removing the Old Sensor?
Once you’ve successfully removed the old crank sensor, take a moment to inspect the area. Look for any signs of damage or wear that could cause issues down the line. If everything looks good, you’re ready to install the new one. Make sure it’s secure and properly connected before moving on.
Before you call it a day, double-check all your connections. Test the car to make sure everything’s working as it should. If everything checks out, give yourself a pat on the back. You’ve just completed a job that many people would rather leave to the professionals. Now, you can enjoy the satisfaction of a job well done—and a little extra cash in your pocket.
Table of Contents
- What Exactly is a Crank Sensor?
- How to Locate the Crank Sensor in Your Car?
- How to Safely Remove the Crank Sensor?
- Do You Need Special Tools for This Job?
- How to Check the New Sensor Before Installing It?
- How to Avoid Common Mistakes When Removing a Crank Sensor?
- What Tools Do You Need to Replace the Crank Sensor?
- Why Should You Do This Job Yourself?
Replacing a crank sensor might seem intimidating at first, but with the right approach, it’s totally manageable. By following these steps, you can save yourself a lot of money and gain some valuable skills. Just remember to take your time, use the right tools, and double-check everything before you call it a day. With a bit of patience and effort, you’ll be back on the road in no time.

Detail Author:
- Name : Mrs. Aliya Hamill PhD
- Username : cullen.schmidt
- Email : hbeahan@lowe.com
- Birthdate : 1992-09-17
- Address : 2969 Smith Underpass Suite 439 North Johan, MS 63906-0926
- Phone : 1-361-536-9955
- Company : Miller-Beer
- Job : Interviewer
- Bio : Et aliquid numquam quidem qui sint. Maxime expedita vel quam quasi. Aliquid assumenda quam cum itaque porro.
Socials
instagram:
- url : https://instagram.com/archibald_hettinger
- username : archibald_hettinger
- bio : Nam est repudiandae officiis vero. Non deleniti a nostrum nam.
- followers : 4300
- following : 2641
linkedin:
- url : https://linkedin.com/in/archibald7040
- username : archibald7040
- bio : Neque molestiae nobis rerum magnam deleniti.
- followers : 1884
- following : 2191
facebook:
- url : https://facebook.com/hettingera
- username : hettingera
- bio : Dolorem est aut natus est fugit tempore omnis.
- followers : 5478
- following : 1072
