Are you looking to add a splash of color and charm to your home, party, or special event? Tissue paper flowers might just be the answer! These lightweight, affordable, and customizable creations are perfect for brightening up any space. Whether you're a crafting enthusiast or a beginner, making flowers out of tissue paper is easier than you think. With just a few materials and some basic techniques, you'll be on your way to crafting beautiful blooms in no time.
These flowers are incredibly versatile, and their simplicity makes them a favorite among crafters of all ages. Kids love making them because they're hands-on and fun, while adults appreciate their decorative potential and budget-friendly nature. From weddings to birthday parties, these handmade treasures can transform any setting with their vibrant hues and delicate textures.
As you explore how to make flowers out of tissue paper, you'll discover that creativity is the only limit. The possibilities are endless, and the best part? You don't need expensive tools or materials. In fact, most of what you need might already be sitting in your craft box. Let's take a closer look at how to craft these delightful blooms, step by step.
What Supplies Do You Need for Tissue Paper Flowers?
Before we get into the nitty-gritty of crafting, it's important to know what you'll need. Gather the following items so you're all set to go:
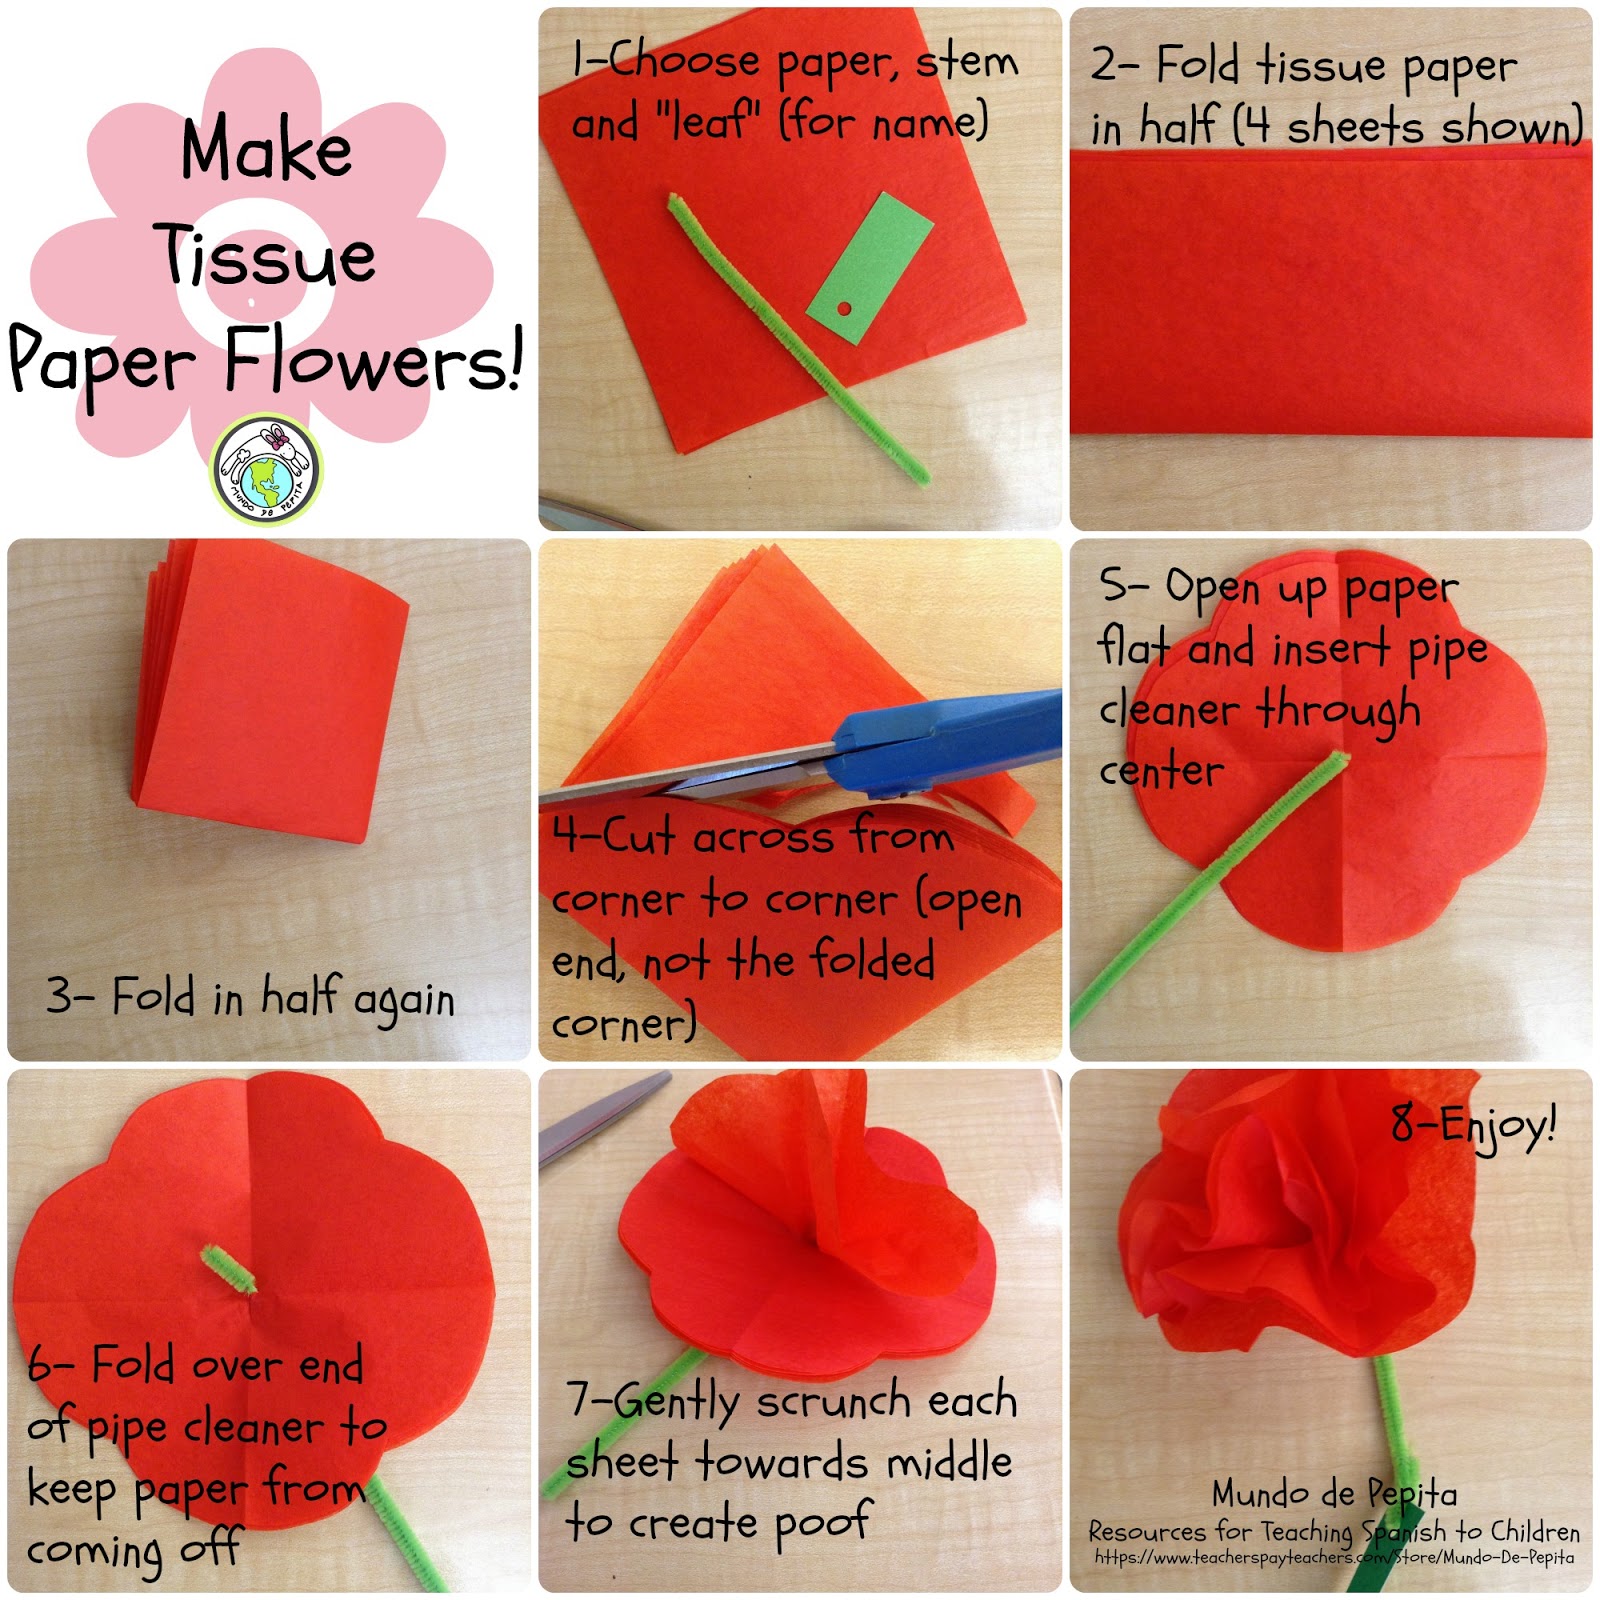
- Tissue paper in your favorite colors
- Scissors (sharp ones work best)
- Pipe cleaners, wire, or twist ties for stems
- A cup or circular object to trace circles
You could even print out your own tissue paper designs for truly unique blooms. Keep in mind that the quality of your tissue paper matters, so if possible, go for thicker paper that holds its shape better. Now, let's move on to the fun part!
How Do You Start Making Tissue Paper Flowers?
Alright, so the first step in learning how to make flowers out of tissue paper is stacking. You'll want to stack around 10 to 12 sheets of tissue paper on top of each other. If you're going for a larger decorative flower, ensure your paper is 13 by 20 inches. This gives you plenty of room to work with and ensures your flowers have that lush, full appearance.
- Ivy Wolk
- Interlochen Summer Camp
- Rachel Gunn Breakdancing
- How Tall Is Justin Bieber
- Empire Of The Sun Running For The Thrill Of It
Next, fold the stack together like an accordion. You want to create a strip that's roughly 1 inch thick. Don't worry if it's not perfect—these flowers are all about charm and personality, not perfection. Once folded, secure the center with a pipe cleaner, wire, or twist tie. This is what will eventually become the stem of your flower.
Why Should You Use the Accordion Fold Technique?
Now, you might be wondering why the accordion fold is so crucial. Well, this technique is what gives your tissue paper flowers their full, fluffy look. By folding the paper back and forth in even sections, you create layers that fan out beautifully once you start separating the petals. It's almost like magic!
So, here's the thing: if you're new to crafting or a bit nervous about getting it right, don't sweat it. The beauty of tissue paper flowers is that they're forgiving. Even if your folds aren't perfectly straight, you'll still end up with a stunning result. Plus, the more you practice, the better you'll get.
What Are Some Tips for Customizing Your Flowers?
Once you've mastered the basic technique, it's time to have some fun. Customizing your tissue paper flowers is where the real creativity comes in. You can experiment with different colors, sizes, and shapes to create unique blooms. For instance, try using a cup or circular object to trace petals, or freehand cut them for a more organic look.
Here are a few ideas to inspire you:
- Use multiple colors of tissue paper for a gradient effect
- Layer different shades to create depth
- Experiment with petal shapes—round, pointed, or jagged edges
Basically, the more you play around with your designs, the more exciting your results will be. Don't be afraid to mix and match until you find a style that speaks to you.
How Can You Make Flowers Out of Tissue Paper Look Realistic?
So, you've got the basics down, but how do you make your tissue paper flowers look more realistic? It's all about fluffing and shaping. After securing the center of your folded stack, gently spread the layers apart. Start from the bottom and work your way up, pulling each layer outward slightly.
For an extra touch, curl the edges of the petals with the tip of your scissors. This gives them a softer, more natural appearance. You can also twist the pipe cleaner stem to mimic the look of a real flower stem. These small details might seem insignificant, but they can make a big difference in the overall look of your creation.
How Do You Assemble the Final Tissue Paper Flower?
Alright, so you've fluffed and shaped your petals—what's next? Well, it's time to assemble your flower. Start by trimming the edges of your folded stack into a rounded shape. This helps create the illusion of petals. Then, carefully separate each layer of tissue paper, pulling them outward and upward.
As you spread the layers, you'll notice your flower beginning to take shape. Keep adjusting until you're happy with the fullness and symmetry. Sometimes, it's just a little tweak here or there that makes all the difference. Once you're satisfied, your flower is ready to shine!
What Are Some Creative Ways to Use Tissue Paper Flowers?
So, you've made your first batch of tissue paper flowers—what now? The options are practically endless. These flowers aren't just for decoration; they can serve as meaningful gifts, charming centerpieces, or even accessories. Here are a few ideas to spark your imagination:
- Accent a wreath with colorful blooms
- Create a vibrant bouquet for a friend or loved one
- Design a flower corsage for a special occasion
- Use them as photo backdrops for social media or events
In some respects, tissue paper flowers are the ultimate craft project because they're both practical and beautiful. Plus, they're budget-friendly, so you can create as many as you want without breaking the bank.
Who Can Enjoy Making Tissue Paper Flowers?
Tissue paper flowers are a craft that truly anyone can enjoy. Whether you're a parent looking for a fun activity to do with your kids or an adult seeking a relaxing hobby, this project has something for everyone. Kids love the hands-on aspect of cutting, folding, and fluffing, while adults appreciate the satisfaction of creating something beautiful.
For example, parents often treasure handmade flowers from their children for years. These simple creations carry a special kind of charm that store-bought flowers simply can't match. Plus, they're a great way to encourage creativity and fine motor skills in young ones.
How to Make Flowers Out of Tissue Paper - A Summary
As we've explored, making flowers out of tissue paper is a delightful and rewarding craft. From gathering your supplies to assembling your final blooms, each step is a chance to express your creativity. Whether you're crafting for a special event, decorating your home, or simply enjoying a relaxing afternoon, tissue paper flowers are a wonderful way to add beauty and charm to your life.
Remember, the key to success is having fun and letting your imagination run wild. So grab your supplies, invite a friend, and start crafting those colorful blooms. After all, who wouldn't love a bouquet of tissue paper flowers?
Table of Contents:
- What Supplies Do You Need for Tissue Paper Flowers?
- How Do You Start Making Tissue Paper Flowers?
- Why Should You Use the Accordion Fold Technique?
- What Are Some Tips for Customizing Your Flowers?
- How Can You Make Flowers Out of Tissue Paper Look Realistic?
- How Do You Assemble the Final Tissue Paper Flower?
- What Are Some Creative Ways to Use Tissue Paper Flowers?
- Who Can Enjoy Making Tissue Paper Flowers?


Detail Author:
- Name : Prof. Janet Collier DDS
- Username : jovanny.hodkiewicz
- Email : ddickinson@yahoo.com
- Birthdate : 1981-08-28
- Address : 2930 Reymundo Fall New Ivy, IN 22005-2358
- Phone : 1-225-968-9507
- Company : Corkery LLC
- Job : Heat Treating Equipment Operator
- Bio : Cum a rerum molestiae necessitatibus enim molestiae maiores. Numquam soluta reiciendis qui eveniet dignissimos rerum. Recusandae et voluptatibus velit est.
Socials
linkedin:
- url : https://linkedin.com/in/jaylenwolff
- username : jaylenwolff
- bio : Earum est aut et. Maiores odio et autem ut.
- followers : 2836
- following : 2607
twitter:
- url : https://twitter.com/jwolff
- username : jwolff
- bio : Et at rem ut et. Dolores culpa et sit accusamus architecto. Doloribus autem minima consectetur reiciendis.
- followers : 1928
- following : 1434
facebook:
- url : https://facebook.com/jwolff
- username : jwolff
- bio : Adipisci sunt quam molestias nemo recusandae et.
- followers : 6390
- following : 1639
tiktok:
- url : https://tiktok.com/@jaylen_id
- username : jaylen_id
- bio : Voluptatem explicabo qui ipsam culpa.
- followers : 1080
- following : 134
