Boots are one of the most versatile footwear options out there, and learning how to draw them can be a fun and rewarding experience. Whether you're sketching for fun or working on a fashion design project, mastering the art of boot drawing is a valuable skill. In this article, we will explore various techniques, tips, and resources to help you create stunning boot illustrations.
From cowboy boots to rain boots, the possibilities are endless. This guide will walk you through simple steps and provide you with useful tools to enhance your drawing abilities. With a little practice and the right approach, anyone can learn how to draw boots that look realistic and stylish.
By the end of this guide, you'll have a solid understanding of how to create different types of boots, how to add texture and depth, and how to make your drawings stand out. So grab your pencil, and let's get started!
Table of Contents
- How Can I Start Drawing Boots?
- How to Draw Boots - Step by Step Instructions
- What Are Some Tips for Drawing Boots?
- How to Add Details to Your Boot Drawing
- How to Draw Boots for Beginners
- Exploring Different Styles of Boot Illustrations
- Where Can I Find Resources to Improve My Boot Drawing Skills?
- Final Thoughts on How to Draw Boots
How Can I Start Drawing Boots?
Before jumping into the specifics, it's helpful to think about the basics. Drawing boots, like anything else, starts with a solid foundation. You don’t need fancy materials—just a pencil, eraser, and some paper. Start by sketching the general shape of the boot. It's almost like creating a blueprint for what's to come. For instance, if you're drawing a cowboy boot, focus on the tall, pointed toe and the high cuff. If it's a rain boot, think about the smooth, rounded edges.
As I was saying, it's important to take your time. Rushing through the initial steps can make the rest of the process a bit tricky. Take a moment to observe real boots or pictures of them. This observation helps you understand the curves and lines that define each style. In short, the foundation you lay down will guide the rest of your drawing journey.
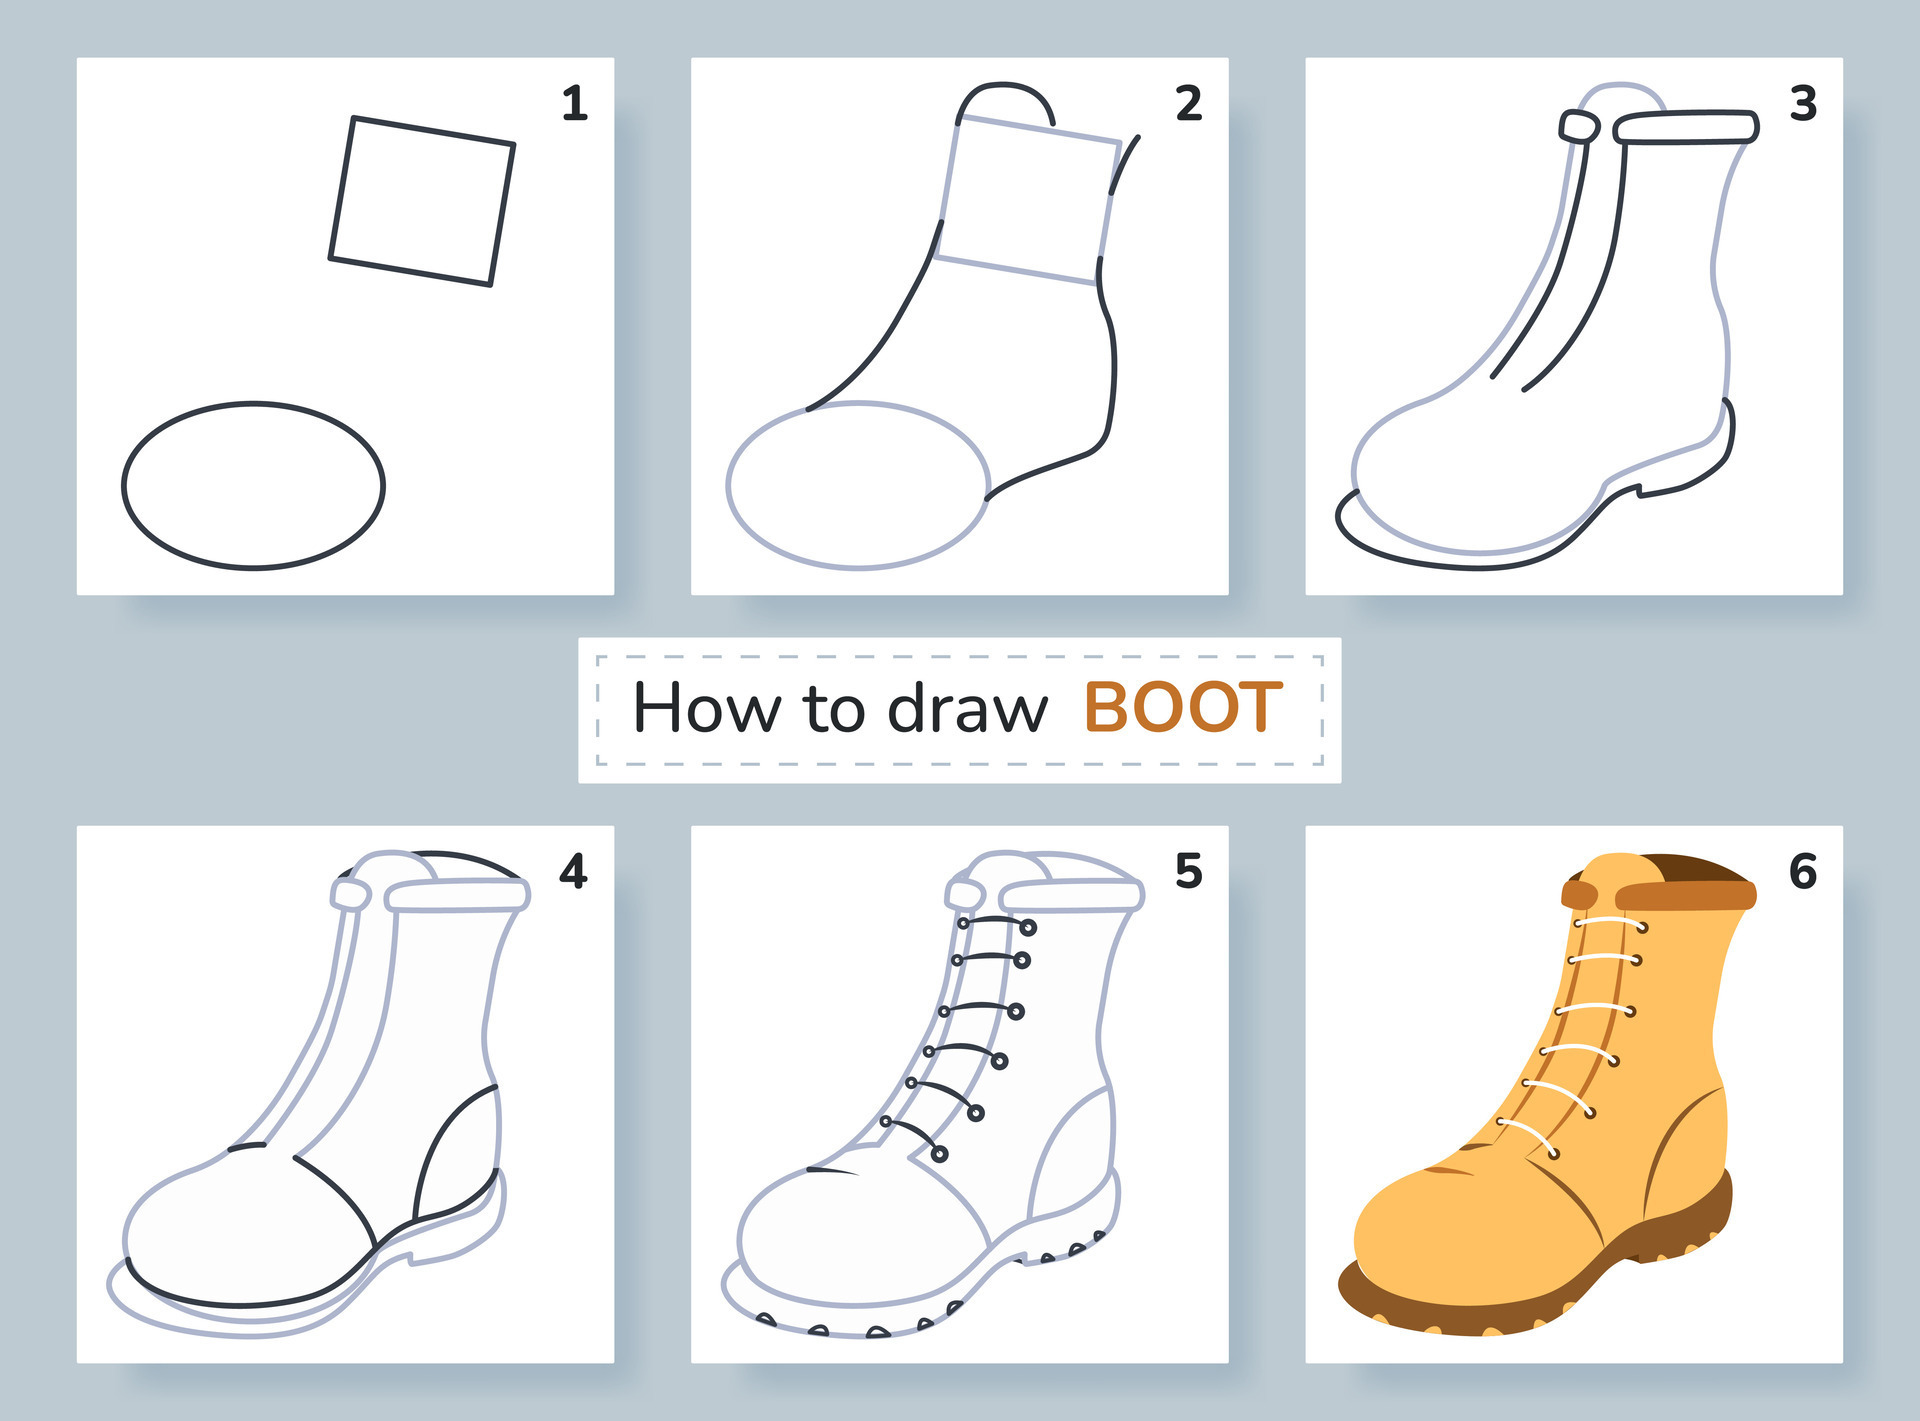
How to Draw Boots - Step by Step Instructions
Alright, let’s talk about the steps. First, sketch the basic shape. This could be a rectangle or an oval depending on the type of boot you’re drawing. For example, hiking boots often have a chunkier look, so you might want to start with a boxy outline. Cowboy boots, on the other hand, tend to have a more streamlined shape.
Once you’ve got the outline, focus on adding details. For instance, draw the laces. They’re usually crisscrossed, but sometimes they can be straight or even decorative. Then, add the sole. This part is crucial because it gives the boot its weight and presence. Finally, think about texture. Are there seams? Stitches? Little details like these can make a big difference in how realistic your drawing looks.
What Are Some Tips for Drawing Boots?
Here’s a little secret: sometimes less is more. Don’t feel the need to add every single detail right away. Start with the most important parts and build from there. For example, the toe of the boot is a key feature. Make sure it’s proportionate to the rest of the boot. If it’s too small or too large, the whole drawing might look off.
Another tip is to consider the angle. Are you drawing the boot from the side, front, or back? Each angle changes the way you perceive the boot’s shape. For instance, drawing a boot from the side might require you to emphasize the curve of the heel. Drawing it from the front could mean focusing more on the laces and the opening.
How to Add Details to Your Boot Drawing
Details are what bring your drawing to life. Let’s talk about shading. Shading adds depth and makes the boot look three-dimensional. Start with light shading and gradually build it up. For example, darker shading around the edges can make the boot look more realistic. You can also play with textures. Is the boot leather? Canvas? Rubber? Each material reflects light differently, so think about how that affects your shading.
Don’t forget about weathering. If you want your boot to look worn and used, add scratches, scuffs, and even dirt. These small touches can make a huge impact. For instance, adding darker shading around the toe or heel can suggest wear and tear. It’s all about making your drawing look authentic.
How to Draw Boots for Beginners
For those who are just starting, there’s no need to feel overwhelmed. Drawing boots is more about practice than perfection. Start with simple shapes. For example, try drawing a basic rain boot. It’s a great way to get familiar with the basic structure. Then, move on to more complex styles like cowboy boots or hiking boots.
Another helpful trick is to watch video tutorials. There are plenty of artists out there, like Mark Crilley, who offer step-by-step guidance. Watching someone else draw can give you a clearer idea of how the process works. Plus, you can pause and rewind if you need to go over something again. It’s a pretty handy way to learn.
Exploring Different Styles of Boot Illustrations
Not all boots are the same, and neither should your drawings be. There’s a wide variety of styles to explore. For instance, cartoon boots might have exaggerated features, like oversized laces or rounded toes. Fashion sketches, on the other hand, often focus on sleek lines and elegant proportions. Anime boots could feature intricate details, like zippers or buckles, that add to the character’s personality.
It’s fun to experiment with different styles. Sometimes, combining elements from various styles can create something unique. For example, you might take the sleek lines of a fashion boot and add the rugged texture of a hiking boot. It’s all about finding what works for you and letting your creativity shine through.
Where Can I Find Resources to Improve My Boot Drawing Skills?
There’s a wealth of resources available online. Platforms like Pinterest are filled with ideas and inspiration. You can find images of boots in all shapes and sizes, which can be a great reference for your drawings. Additionally, many artists share their tutorials on YouTube, offering tips and tricks for different techniques.
For those who want to go deeper, there are online courses that focus on advanced techniques. These courses often cover shading, texture, and perspective in great detail. They can be a bit more involved, but they’re worth it if you’re serious about improving your skills. Just remember, it’s okay to start small and work your way up.
Final Thoughts on How to Draw Boots
Learning how to draw boots is a journey that combines creativity and observation. By focusing on the basics, adding details, and exploring different styles, you can create drawings that are both realistic and expressive. Whether you’re a beginner or a seasoned artist, there’s always room to grow and improve.
So, grab your pencil and give it a try. Start with simple shapes and gradually build up to more complex designs. Watch tutorials, experiment with styles, and don’t be afraid to make mistakes. After all, every great artist started somewhere. By practicing regularly and staying curious, you’ll be drawing boots like a pro in no time!


Detail Author:
- Name : Mrs. Aliya Hamill PhD
- Username : cullen.schmidt
- Email : hbeahan@lowe.com
- Birthdate : 1992-09-17
- Address : 2969 Smith Underpass Suite 439 North Johan, MS 63906-0926
- Phone : 1-361-536-9955
- Company : Miller-Beer
- Job : Interviewer
- Bio : Et aliquid numquam quidem qui sint. Maxime expedita vel quam quasi. Aliquid assumenda quam cum itaque porro.
Socials
instagram:
- url : https://instagram.com/archibald_hettinger
- username : archibald_hettinger
- bio : Nam est repudiandae officiis vero. Non deleniti a nostrum nam.
- followers : 4300
- following : 2641
linkedin:
- url : https://linkedin.com/in/archibald7040
- username : archibald7040
- bio : Neque molestiae nobis rerum magnam deleniti.
- followers : 1884
- following : 2191
facebook:
- url : https://facebook.com/hettingera
- username : hettingera
- bio : Dolorem est aut natus est fugit tempore omnis.
- followers : 5478
- following : 1072
