Have you ever wondered how to make wax at home? Creating your own wax is not only fun but also a fantastic way to personalize your beauty or crafting projects. From hair removal solutions to homemade candles, making wax can be an exciting adventure. Plus, it’s a great way to save money and customize products to your liking. If you’re ready to get started, this guide will walk you through the process of making different types of wax, including sugar wax, candle wax, and squeezable wax.
Before diving into the specifics of making wax, it’s essential to understand the basics. Whether you’re aiming to create a soothing candle or a gentle hair removal product, the ingredients and techniques you use will vary. This article will explore the tools, ingredients, and methods involved in crafting your own wax at home. You’ll learn everything from measuring and melting ingredients to adding scents and colors.
Don’t worry if you’re new to the craft. Making wax is simpler than it seems, and with the right guidance, you can create high-quality products in no time. So grab your ingredients, gather your tools, and let’s get started. Here’s how to make wax like a pro!
Table of Contents
- How to Make Wax - A Quick Overview
- What Ingredients Do You Need for Making Wax?
- How to Make Wax for Hair Removal?
- How to Make Candle Wax?
- Tips for Adding Color and Fragrance
- What Are the Benefits of Making Squeezable Wax?
- How to Make Wax Melts at Home?
- Final Thoughts on Making Wax
How to Make Wax - A Quick Overview
So, you’ve decided to make your own wax. That’s awesome! First, it’s important to think about what kind of wax you want to create. Are you making it for candles, hair removal, or even just for fun? The purpose of your project will determine the ingredients and methods you need. For instance, if you’re making candle wax, you’ll likely use soy wax or beeswax. On the other hand, hair removal wax typically involves ingredients like sugar, lemon juice, and honey.
Now, let’s talk about the process. Generally, making wax involves mixing ingredients, melting them together, and allowing the mixture to cool. You’ll need a few basic tools, such as a pot, a wooden spoon, and molds. Depending on the type of wax you’re creating, you might also need essential oils, dyes, or wicks. It’s all about finding the right balance of ingredients to achieve the desired result.
What Ingredients Do You Need for Making Wax?
Alright, let’s break down the ingredients you’ll need. For candle wax, you’ll typically use soy wax flakes, beeswax, or paraffin wax. These materials are easy to find and provide a solid base for your candles. When making hair removal wax, sugar is your best friend. Combine it with lemon juice and water for a natural and effective solution. If you’re going for squeezable wax, you’ll need beeswax and vegetable oil to create a pliable mixture.
- Lloyd Dumb And Dumber
- Wingstop Survey
- Carlos Slim Helu
- Visual Arts Center Of Richmond
- New Buffalo Casino
Here’s a quick list of common ingredients:
- Soy wax flakes or beeswax
- Granulated sugar
- Lemon juice
- Coconut oil or vegetable oil
- Essential oils for fragrance
- Dyes for color
How to Make Wax for Hair Removal?
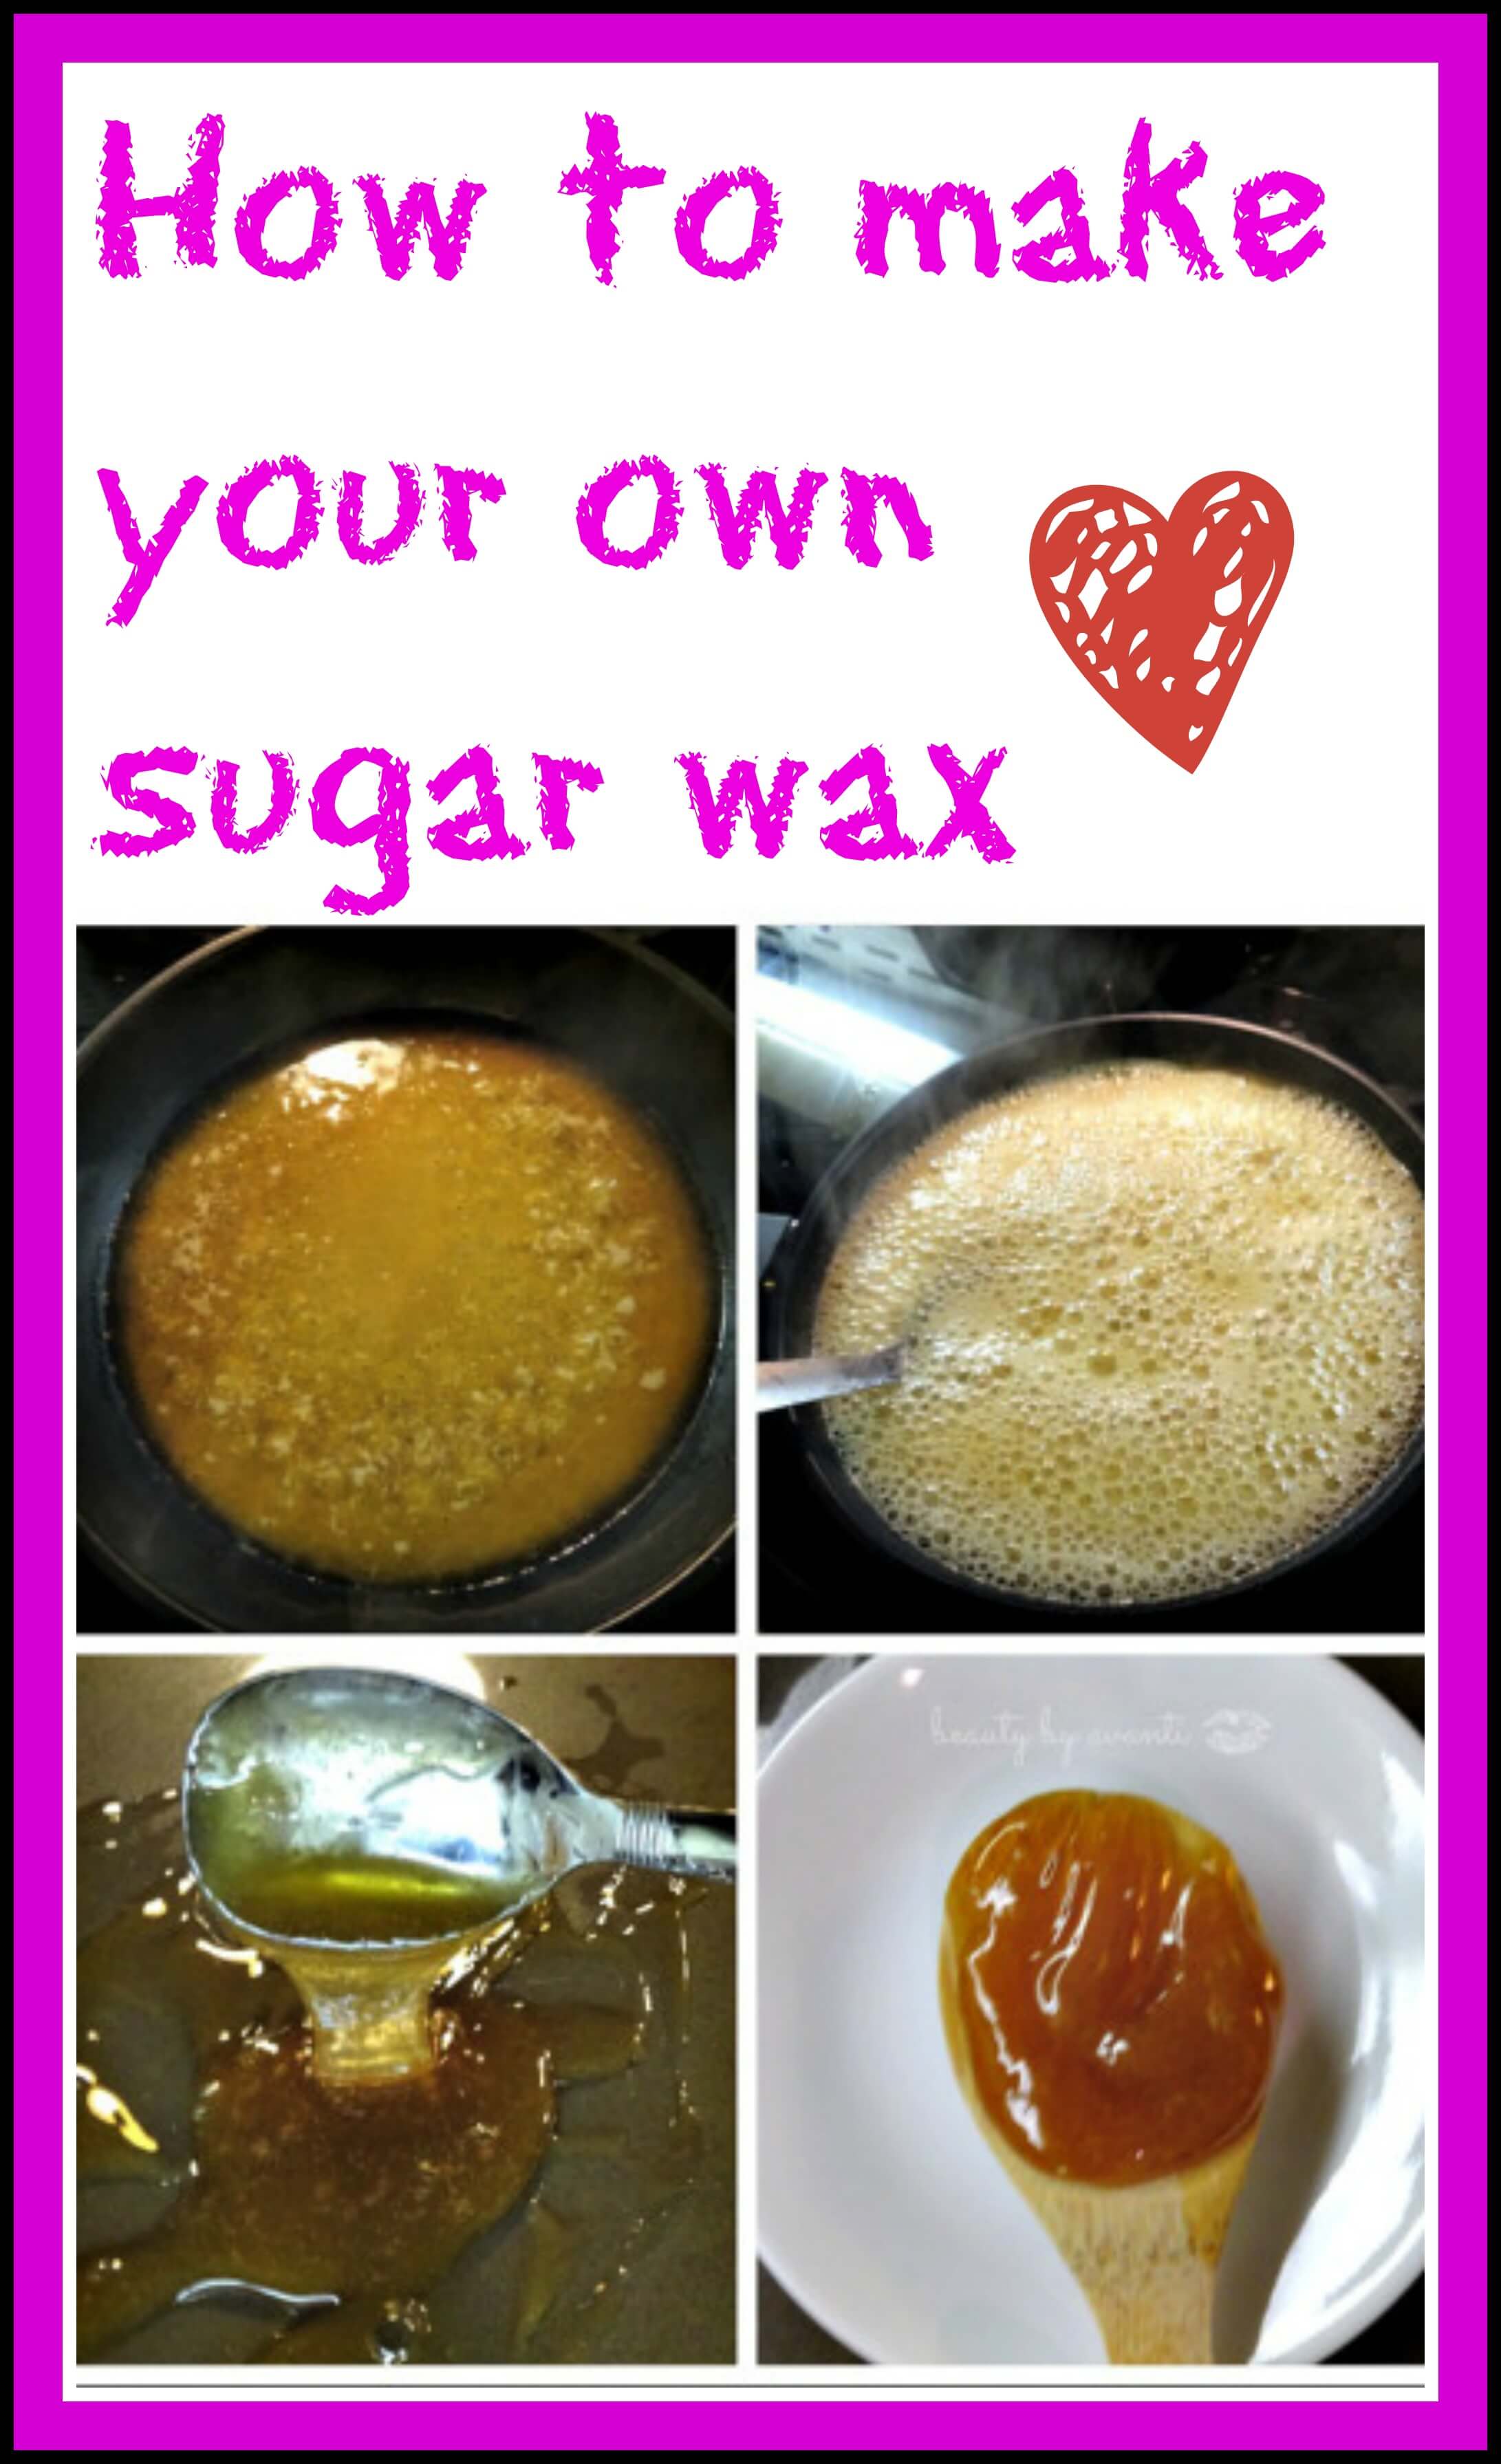
Making wax for hair removal is easier than you might think. The key is to find the right consistency and ensure the mixture is safe to use on your skin. Start by adding 1 cup of granulated sugar, ¼ cup of lemon juice, and ¼ cup of water to a saucepan. Heat the mixture over medium-high heat, stirring occasionally, until it reaches a golden brown color. This usually takes about 5-10 minutes. Once it’s ready, carefully pour the mixture into a heat-resistant container and let it cool slightly before use.
For an added touch, you can mix in a bit of honey for extra moisture. Honey not only enhances the texture but also provides antibacterial properties, making it a great choice for sensitive skin. Just a little, really, can go a long way.
How to Make Candle Wax?
Creating candle wax is a bit different from making hair removal wax, but it’s just as rewarding. First, measure out your wax flakes and place them in a double boiler. If you don’t have a double boiler, you can use a heatproof bowl set over a pot of simmering water. Let the wax melt slowly, stirring occasionally to ensure it heats evenly. Once melted, remove it from the heat and let it cool slightly.
Next, add your preferred fragrance oils and dyes. Stir gently to avoid creating air bubbles. Pour the mixture into your candle molds or containers, making sure to leave about 1 ½ inches of space at the top. Insert the wicks carefully, ensuring they stay centered. Allow the candles to cool completely before trimming the wicks.
Tips for Adding Color and Fragrance
Adding color and fragrance to your wax is where the fun begins. For candles, you can use liquid dyes or dye chips to achieve the perfect shade. Start with a small amount and add more gradually until you reach the desired color. As for fragrance, essential oils are a great choice. They not only smell amazing but also offer various benefits depending on the oil you choose.
Remember to add fragrance oils after the wax has melted but before it cools too much. This ensures the scent is evenly distributed throughout the candle. A little tip: test your fragrance blend in a small batch first to make sure you like the smell.
What Are the Benefits of Making Squeezable Wax?
Squeezable wax is a versatile option that’s perfect for crafting or even as a fun toy for kids. To make squeezable wax, combine beeswax and vegetable oil in a pot and melt them together. Once melted, pour the mixture into a squeezable bottle or container. Allow it to cool completely before using. The result is a soft, pliable wax that can be molded into different shapes.
Squeezable wax tends to be less messy than traditional candle wax, making it ideal for projects where precision isn’t as critical. Plus, it’s a great way to experiment with different scents and colors without worrying about the wax hardening too quickly.
How to Make Wax Melts at Home?
Wax melts are another fantastic way to enjoy fragrant scents without the hassle of lighting a candle. To make wax melts, start by melting your wax flakes in a double boiler. Once melted, divide the mixture into small silicone molds. Add your chosen fragrance oils and dyes, stirring gently to combine. Let the molds cool completely before popping out the wax melts.
For an extra touch, you can use wax melt liners to keep your wax warmer clean and make it easier to switch out scents. These liners are specifically designed for wax melts and prevent the wax from seeping through, unlike regular cupcake liners.
Final Thoughts on Making Wax
Learning how to make wax is a rewarding experience that opens up a world of possibilities. Whether you’re creating candles, hair removal wax, or squeezable wax, the process is both creative and fulfilling. By following the steps outlined in this guide, you’ll be able to craft high-quality wax products that suit your needs and preferences.
So, go ahead and experiment with different ingredients, scents, and colors. The more you practice, the better you’ll get. Before you know it, you’ll be making wax like a pro. Happy crafting!


Detail Author:
- Name : Prof. Domenick Senger
- Username : kristin09
- Email : marcus.macejkovic@yahoo.com
- Birthdate : 1994-04-17
- Address : 51944 Lesch Mill Apt. 981 Port Kamille, AL 93093
- Phone : 1-603-245-4707
- Company : Rosenbaum Ltd
- Job : Mechanical Engineer
- Bio : Ad sit dolore est nihil ut numquam nam facilis. Commodi veritatis in iste soluta eius laudantium illo. Cupiditate beatae nemo qui voluptas assumenda voluptatem.
Socials
twitter:
- url : https://twitter.com/glenferry
- username : glenferry
- bio : Temporibus eos aut ullam id adipisci sed omnis. Tempora dolores eos rem autem. Velit accusamus error qui. Sit ut nulla dolorem laborum.
- followers : 2754
- following : 821
tiktok:
- url : https://tiktok.com/@glen_ferry
- username : glen_ferry
- bio : Voluptates corporis illum accusantium laborum est.
- followers : 3953
- following : 2993
instagram:
- url : https://instagram.com/glen_ferry
- username : glen_ferry
- bio : Aut et omnis cumque asperiores enim. Sint sit suscipit unde exercitationem rerum.
- followers : 1971
- following : 1290
facebook:
- url : https://facebook.com/glenferry
- username : glenferry
- bio : Et nobis vero possimus provident sit culpa ea.
- followers : 6717
- following : 1625
