Building steps for your deck might seem like a challenging task, but with the right approach, it’s absolutely doable. Whether you’re a seasoned DIY enthusiast or someone just getting started with home improvement projects, this guide will walk you through the entire process. From planning and gathering materials to cutting and assembling the steps, we’ll cover everything you need to know to ensure your deck stairs are safe, sturdy, and stylish.
Deck stairs serve as an essential connection between your outdoor living space and the rest of your property. They’re more than just functional—they can enhance the overall aesthetic appeal of your deck. However, before you grab your tools and start hammering away, it’s important to plan carefully and understand the basics of stair construction. With the right tools, materials, and a bit of patience, you can create stairs that are both practical and pleasing to the eye.
So, if you’re ready to tackle this project and turn your dream deck into a reality, let’s get started. Below, we’ll explore the ins and outs of building deck stairs, offering tips and tricks to help you along the way. Remember, the key to success is preparation, precision, and a willingness to learn as you go.
- Analytical Meaning
- True Food Kitchen Chicago
- Actress Rani Mukherjee
- Hi Ren Lyrics
- Uncle Rico Napoleon Dynamite
Table of Contents
- How to Plan Your Deck Stairs
- What Tools and Materials Do You Need?
- How to Measure and Cut the Stringers?
- How to Attach Treads and Risers?
- Tips for Building Box Steps
- Common Mistakes to Avoid When Building Deck Stairs
- How to Ensure Safety and Compliance?
- Final Thoughts on How to Build Steps for a Deck
How to Plan Your Deck Stairs?
Planning is the foundation of any successful project, and building deck stairs is no exception. So, where should you start? First, think about where people will naturally enter or leave the deck. This will give you a good idea of the best spot for your stairway. By considering the flow of traffic, you can make sure your stairs are both convenient and safe. For instance, placing stairs near a door or walkway can make it much easier for folks to get on and off the deck.
Now, let’s talk about the layout. A short, straight run of open stairs using notched stringers is the most common type. However, depending on the height of your deck and your personal preferences, you might opt for box stairs or even a cascading staircase. Just a little planning upfront can save you a lot of headaches down the road. So, take the time to sketch out your ideas and make any necessary adjustments before moving forward.
What Tools and Materials Do You Need?
Before diving into the construction phase, you’ll want to gather all the necessary tools and materials. Here’s a list of the basic necessities you should have on hand:
- Lumber - typically 2x12 boards for stringers, and deck boards for treads and risers
- Screws or nails
- Circular saw or handsaw
- Tape measure
- Level
- Clamps
Each of these tools will play a role in the construction process. For example, a circular saw is perfect for cutting through thick lumber, while a level ensures everything is even and secure. Of course, you’ll also need a good tape measure to get accurate measurements for your stringers, treads, and risers. Having the right tools makes all the difference, so don’t skimp on quality.
How to Measure and Cut the Stringers?
Stringers are the backbone of your deck stairs, providing structural support for the treads and risers. To measure and cut them properly, start by determining the total rise and run of your stairs. The rise is the vertical distance from the ground to the deck surface, while the run is the horizontal distance the stairs will cover. Once you’ve got these measurements, you can calculate the number of steps you’ll need and the rise and run for each individual step.
For a standard stair, you’re looking at roughly ten inches wide and eight inches tall. However, if your deck is less than 18 inches tall, you might only need one step. After calculating, use a framing square to mark the cuts on your 2x12 boards. Then, carefully cut along the lines with your saw. It’s crucial that every step is the same height to prevent tripping hazards. Take your time and double-check your work to ensure accuracy.
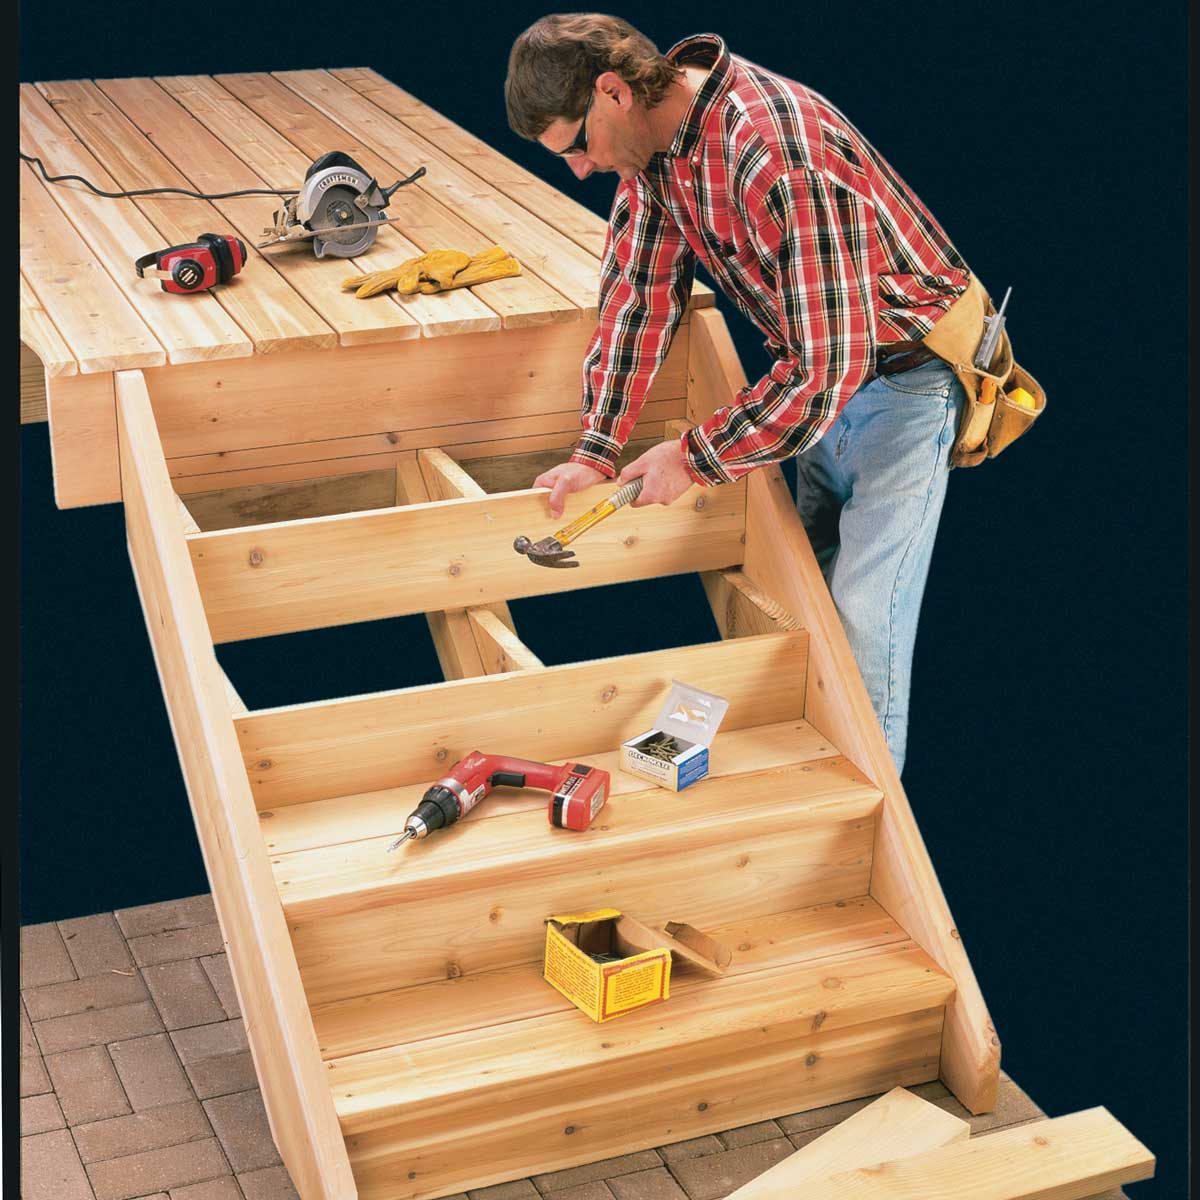
How to Attach Treads and Risers?
With your stringers cut and ready to go, it’s time to attach the treads and risers. Treads are the horizontal boards that create the footing area for each step, while risers cover the vertical distance between the treads. Typically, a deck stair tread consists of two deck boards placed side by side. To attach them, start by screwing the treads into the stringers, ensuring they’re level and evenly spaced.
Risers, on the other hand, are optional but can add a finished look to your stairs. If you decide to include them, simply attach them to the front of each step using screws. Make sure everything is secure and stable before moving on to the next step. This part of the process might take a little extra time, but it’s worth it to ensure your stairs are safe and sturdy.
Tips for Building Box Steps
For decks that are relatively low to the ground, box steps can be a great alternative to traditional notched stringers. Box steps are essentially a series of boxes stacked on top of each other, creating a clean and simple design. One of the advantages of box steps is that they don’t require any cutting or notching, making them a bit easier to construct.
To build box steps, you’ll need to construct rectangular frames for each step and stack them in place. Use screws to secure each box to the one below it, ensuring everything is level and aligned. Once all the boxes are in place, attach the treads and risers as you would with any other type of stair. Box steps can be a good option if you’re looking for a more straightforward approach to building deck stairs.
Common Mistakes to Avoid When Building Deck Stairs
Building deck stairs might seem straightforward, but there are a few common mistakes that could trip you up. One of the biggest errors is not making every step the same height. Even a slight difference in height can cause someone to stumble, so it’s essential to measure carefully and cut precisely. Another common issue is neglecting to check for levelness as you go. A slightly uneven stair can lead to wobbling and instability, which is a safety hazard.
Additionally, failing to follow local building codes could result in problems down the line. Always double-check the regulations in your area to ensure your stairs are compliant. By avoiding these pitfalls and paying attention to detail, you can create stairs that are both safe and satisfying.
How to Ensure Safety and Compliance?
Safety should always be your top priority when building deck stairs. One way to ensure safety is by using a stair calculator to determine the number of stairs and the rise and run of each individual step. This tool can help you avoid miscalculations and ensure your stairs meet the necessary standards. Moreover, covering the top screws with a trim board can create a seamless transition and enhance the overall appearance of your stairs.
Compliance with local building codes is just as important. These codes are in place to protect you and your family, so it’s crucial to adhere to them. If you’re unsure about any regulations, consult with a local contractor or building inspector to get the information you need. Taking the time to ensure safety and compliance will give you peace of mind and help prevent potential issues in the future.
Final Thoughts on How to Build Steps for a Deck
Building steps for a deck can be a rewarding project that adds value and functionality to your outdoor space. By following the steps outlined in this guide, you can create stairs that are not only safe and sturdy but also visually appealing. From planning and gathering materials to cutting and assembling the steps, each phase of the process plays a role in the final outcome.
Remember, patience and preparation are key. Take the time to measure carefully, cut precisely, and assemble securely. With a bit of effort and a lot of determination, you can transform your deck into a welcoming and accessible space for you and your loved ones to enjoy. So, grab your tools, roll up your sleeves, and let’s get to work!


Detail Author:
- Name : Prof. Janet Collier DDS
- Username : jovanny.hodkiewicz
- Email : ddickinson@yahoo.com
- Birthdate : 1981-08-28
- Address : 2930 Reymundo Fall New Ivy, IN 22005-2358
- Phone : 1-225-968-9507
- Company : Corkery LLC
- Job : Heat Treating Equipment Operator
- Bio : Cum a rerum molestiae necessitatibus enim molestiae maiores. Numquam soluta reiciendis qui eveniet dignissimos rerum. Recusandae et voluptatibus velit est.
Socials
linkedin:
- url : https://linkedin.com/in/jaylenwolff
- username : jaylenwolff
- bio : Earum est aut et. Maiores odio et autem ut.
- followers : 2836
- following : 2607
twitter:
- url : https://twitter.com/jwolff
- username : jwolff
- bio : Et at rem ut et. Dolores culpa et sit accusamus architecto. Doloribus autem minima consectetur reiciendis.
- followers : 1928
- following : 1434
facebook:
- url : https://facebook.com/jwolff
- username : jwolff
- bio : Adipisci sunt quam molestias nemo recusandae et.
- followers : 6390
- following : 1639
tiktok:
- url : https://tiktok.com/@jaylen_id
- username : jaylen_id
- bio : Voluptatem explicabo qui ipsam culpa.
- followers : 1080
- following : 134
